How to Chalk Paint Unfinished Furniture: A Beginner's Guide

Chalk paint has earned a cult following for good reason. It sticks to nearly anything, dries to a gorgeous matte finish, and forgives the kind of mistakes that would ruin a project with traditional paint. For anyone working with unfinished furniture, especially clean-grained woods like premium-grade plywood, chalk paint is one of the most satisfying finishes you can choose.
Whether you want a solid opaque coat, a soft washed look, or a farmhouse-style distressed finish, chalk paint furniture projects are approachable even if you have never picked up a brush. The entire process, from prep to seal, can happen in a single afternoon. And because you are starting with raw, unfinished wood instead of trying to paint over an old lacquered dresser from a thrift store, you skip the most frustrating parts entirely: stripping, sanding through old finishes, and priming.
This guide walks through every step of chalk painting unfinished furniture, with specific tips for working on premium-grade plywood pieces like the ones in the UNFNSHED collection.

Why Chalk Paint Works So Well on Unfinished Wood
Most chalk paint tutorials online focus on refinishing old furniture. They start with sanding off chipped paint, dealing with mystery finishes, and hoping the primer actually bonds. When you start with unfinished wood, you skip all of that. The raw surface is already ideal for paint adhesion.
premium-grade plywood, the material used in UNFNSHED nightstands and side tables, is particularly well-suited for chalk paint. It has a tight, consistent grain with minimal knots, so the paint lays down evenly without blotchy absorption. The surface is smooth enough that you do not need to sand aggressively before painting, yet porous enough that chalk paint grips without a primer coat.
Chalk paint also works with the natural character of plywood rather than against it. If you apply a thin coat, the wood grain shows through for a washed, organic feel. Build up to two or three coats and you get full, velvety coverage. Either way, the matte finish feels intentional and modern on clean-lined furniture.
Starting with unfinished wood means you spend your time creating, not correcting. No stripping, no guessing, no fighting with old finishes.
What You Need: Materials and Tools
- Chalk paint (Annie Sloan, Rust-Oleum Chalked, or any brand you prefer), 1 quart is enough for most small furniture
- 220-grit sandpaper or a fine sanding sponge
- A quality 2-inch brush (natural bristle or a round wax brush)
- A small foam roller (optional, for smoother coverage on large flat surfaces)
- Clear wax or matte polycrylic sealer
- Tack cloth or a damp lint-free rag
- Drop cloth or old sheet
- Painter's tape (if doing two-tone or geometric designs)
- Dark wax (optional, for an antiqued look)
A quick note on paint brands: Annie Sloan is the original and widely available. Rust-Oleum Chalked is sold at most hardware stores and costs less. Country Chic, Dixie Belle, and Jolie are also popular. For your first project, pick whichever brand has a color you love and is easy to get. The technique matters more than the brand.
Step 1: Surface Prep
Light Sanding
On unfinished premium-grade plywood, your prep work is minimal. Take a sheet of 220-grit sandpaper and give the entire surface a light once-over, moving with the grain. You are not trying to reshape anything. You are just knocking down any tiny raised fibers from manufacturing and giving the surface a slight tooth for the paint to grab.
Pay attention to edges and corners, which sometimes have a slightly rougher texture from the cutting process. A fine sanding sponge works well for curved or hard-to-reach spots.
Dust Removal
After sanding, wipe every surface with a tack cloth. This step is easy to skip and important not to. Sanding dust left on the wood will mix into your first coat and create a gritty texture. A damp (not wet) lint-free cloth works as a backup if you do not have a tack cloth. Let the surface dry completely before painting.
If your unfinished piece has any pencil marks, light scuffs, or handling smudges, a quick wipe with a lightly damp cloth followed by a gentle sand will take care of them. Chalk paint is forgiving, but starting with a clean surface always produces a better result.
Step 2: Applying Chalk Paint
First Coat
Stir your chalk paint thoroughly. It settles in the can more than regular paint, and the pigment at the bottom needs to be fully incorporated. Do not shake the can, as this creates bubbles. Stir slowly and completely.
Dip your brush about a third of the way into the paint. Chalk paint is thicker than latex, so a little goes further than you expect. Start on the largest flat surface and work in long, even strokes following the wood grain. On a piece like the Mini Side Table, begin with the top, then move to the sides.
The first coat will look uneven, and that is completely normal. On raw wood, especially plywood, the first coat partially absorbs into the surface. You will see brush strokes and some grain showing through. Resist the urge to keep going over the same spot. Overworking wet chalk paint creates drag marks that are harder to fix than just letting the coat dry and adding another.
Drying Time
Chalk paint dries quickly. Most brands are dry to the touch in 30 to 60 minutes depending on humidity and coat thickness. Wait at least one full hour between coats. If the weather is humid or you are working in a garage, give it closer to two hours.
Second and Third Coats
Lightly sand between coats with 220-grit sandpaper, using barely any pressure. This is just to smooth out any texture from brush strokes. Wipe away dust with your tack cloth before applying the next coat.
Two coats give good coverage on most colors. Lighter shades like white, cream, and pale blue typically need three coats over raw wood to reach full opacity. Darker colors like navy, charcoal, and forest green usually look solid after two.
Chalk paint rewards patience between coats and a light hand on the brush. Two thin coats will always look better than one thick one.
Step 3: Distressing (Optional)
Distressing is where chalk paint furniture really shines, and where working on unfinished plywood gives you a unique advantage. When you sand through chalk paint on premium-grade plywood, you reveal clean, pale wood underneath instead of mystery layers of old paint or particle board. The contrast is crisp and intentional.
How to Distress
Wait until your final coat is fully dry. Using 220-grit sandpaper or a fine sanding sponge, gently rub the areas where natural wear would occur: edges, corners, around hardware holes, and raised details. Use light pressure and check your progress frequently. You can always remove more paint, but you cannot put it back.
Distressing Styles
Light distressing: A few gentle passes on edges and corners. This creates a subtle "lived-in" look that works well in modern and Scandinavian interiors. You are just softening the edges rather than creating an obviously aged piece.
Heavy distressing: More aggressive sanding on flat surfaces, revealing large patches of raw wood. This suits farmhouse and cottage styles. On plywood, the exposed layers can create an interesting visual texture, with the thin laminations adding a stripe-like pattern on edges.
Wet distressing: Instead of sanding after the paint dries, use a damp cloth to wipe away paint while the final coat is still slightly tacky. This produces softer, more blended edges than dry sanding. It is harder to control, so practice on the back or bottom of the piece first.


Step 4: Sealing and Protecting Your Finish
Unsealed chalk paint is porous and will absorb stains, watermarks, and fingerprints over time. Sealing is not optional if you want your finish to last, especially on functional pieces like nightstands and tables that see daily use.
Option 1: Clear Wax
Wax is the traditional sealer for chalk paint. Apply a thin, even layer with a wax brush or a lint-free cloth, working in small sections. Buff with a clean cloth after it hazes over, usually 5 to 10 minutes. Wax deepens the color slightly and adds a subtle sheen without looking glossy.
The downside of wax is durability. It needs to be reapplied every 6 to 12 months on high-use surfaces, and it is not as water-resistant as polyurethane. For a bedside nightstand that holds a water glass every night, consider a harder sealer.
Option 2: Matte Polycrylic
Water-based matte polycrylic (Minwax makes a widely available version) provides stronger protection than wax without altering the flat, chalky look. Apply with a synthetic brush or foam applicator in thin coats. Two coats are sufficient for most furniture. Three coats are worth it on table tops.
Polycrylic dries clear, resists water rings, and does not yellow over time. It is a better choice for pieces in kitchens, bathrooms, or kids' rooms where the furniture faces more wear and moisture.
Option 3: Dark Wax for an Antiqued Look
If you want an aged, antique feel, apply clear wax first, then follow with dark wax. Work the dark wax into crevices, edges, and corners, then wipe away the excess from flat surfaces. The dark wax settles into texture and grain lines, creating depth and shadow. Go slowly: dark wax is easier to add than to remove.
Whichever sealer you choose, let your final paint coat cure for at least 24 hours before sealing. Chalk paint may feel dry to the touch in an hour, but it continues to harden for a full day. Sealing too early can trap moisture underneath and cause clouding or peeling later.
Project Ideas and Inspiration
One of the best things about starting with unfinished furniture is that you are not locked into someone else's design decisions. The piece arrives as a blank canvas, ready for whatever vision you have in mind. A few ideas to get you started:
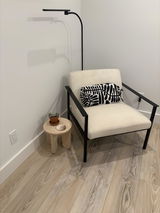
Two-tone nightstand: Paint the body in a muted sage or dusty blue, and leave the top raw with a clear matte seal. The contrast between painted sides and natural birch top looks clean and modern. Painter's tape gives you a sharp dividing line.
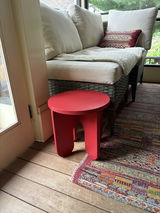
Color-blocked side table: Use two or three complementary chalk paint colors on different surfaces of a Mini Side Table. Geometric color blocking works especially well on simple, modern furniture shapes.
Soft white with dark wax: Classic for a reason. A warm white chalk paint with dark wax rubbed into the edges creates a timeless look that works in almost any room.
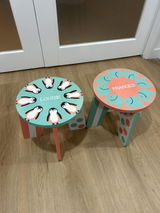
Kids' room custom piece: Chalk paint in bold, saturated colors transforms a simple stool or table into a playful statement. Let the kids pick the color, or better yet, let them help paint. Chalk paint cleans up with water and does not require perfect technique to look good.
Not sure which finish direction to take? The UNFNSHED AI Visualizer lets you preview different paint colors and stain options on actual product photos before you commit. It is a helpful starting point when you are deciding between finishes.
You can also explore more finishing ideas and techniques on the Favorite Finishes page, where UNFNSHED showcases real customer projects and recommended products.

Common Mistakes to Avoid
Applying paint too thick. Thick coats take forever to dry, crack as they cure, and hide the matte texture that makes chalk paint appealing. Multiple thin coats are always the way to go.
Skipping the seal. Unsealed chalk paint looks great for about a week. Then every fingerprint, water ring, and scuff becomes permanent. Take the extra 20 minutes to seal your work.
Not stirring the paint enough. Chalk paint pigment settles heavily. If you do not stir all the way to the bottom of the can, your first few brushloads will be thin and watery while the last few are thick and gritty. Stir thoroughly every time you open the can, and stir again midway through your session.
Distressing before the paint fully dries. If the paint is still soft, sanding will gum up and peel in chunks instead of wearing away smoothly. Give it at least two to three hours, ideally overnight, before you start distressing.
Using the wrong brush. Cheap foam brushes shed and leave bits in the finish. Stiff, coarse bristles leave heavy stroke marks. A quality natural-bristle brush or a dedicated chalk paint brush costs $10 to $15 and makes a real difference in the final result.
Why Unfinished Furniture Is the Best Starting Point
Every chalk paint tutorial eventually mentions how important surface prep is. Sanding, priming, cleaning off old wax or polyurethane, dealing with veneer that chips when you sand it. When you start with a piece that has never been finished, all of those steps shrink down to a quick light sand and a wipe.
UNFNSHED pieces are designed with finishing in mind. The premium-grade plywood is smooth, consistent, and free of knots or defects that would show through paint. The furniture assembles without tools in under two minutes, so you can paint the pieces flat (which is always easier) and then snap them together once the finish is dry and cured.
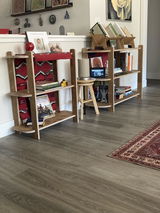
That assembly detail matters more than you might think. Painting a fully assembled bookshelf means brushing around joints, dripping into corners, and trying to reach the back panel. Painting flat panels on a drop cloth, then assembling afterward, gives you cleaner coverage with less effort.
Ready to start your chalk paint project? UNFNSHED furniture ships flat, unfinished, and ready for your vision. Made from premium premium-grade plywood in San Diego, every piece assembles in under two minutes with no tools required.
Browse Unfinished Pieces