How to Whitewash Furniture: Get That Coastal Look

There is something about whitewashed furniture that makes a room feel like it is exhaling. The light catches those soft, chalky layers. The wood grain still whispers through. Everything feels calm, sun-bleached, lived-in. It is the kind of look that turns a bedroom into a beach cottage and a living room into a seaside retreat, no ocean view required.
The best part? Learning how to whitewash furniture is one of the most forgiving DIY finishes out there. You do not need years of woodworking experience. You do not need a spray booth. You need a brush, some watered-down paint, a rag, and about thirty minutes of your afternoon. If you can wipe down a counter, you can whitewash a piece of furniture.
In this guide, we will walk through everything: what whitewashing actually is, why certain woods take to it better than others, three methods to get the look, a detailed step-by-step for the most popular technique, and ideas for making your finished piece feel like it belongs in a catalog. Let's get into it.
What Is Whitewashing, Exactly?
Whitewashing is a finishing technique where diluted white paint or a lime-based wash is applied to bare wood and then partially wiped away before it dries. The result is a translucent, milky layer that lets the natural grain pattern show through. Unlike a solid coat of white paint, whitewash does not hide the wood. It softens it. Think of it as putting a linen curtain over a window instead of closing the shutters.
The technique has been around for centuries. Originally, lime-based whitewash was used on everything from barn walls to cottage ceilings because it was cheap, antibacterial, and easy to reapply. Today, whitewashing has found its second life in interior design, especially in coastal, Scandinavian, farmhouse, and boho spaces where that lived-in, natural texture carries the whole room.
When people talk about whitewashed furniture, they usually mean one of three things: a diluted paint wash, a dry brush technique, or a traditional lime wash. Each gives a slightly different texture, and all of them work beautifully on the right wood.
Whitewash does not hide the wood. It softens it. That is the whole point, and that is why the wood you start with matters so much.
Why Whitewash Works So Well on Birch Plywood

Not all wood takes a whitewash the same way. Pine can get blotchy. Oak's deep grain can swallow the wash unevenly. But premium-grade plywood? It was practically made for this technique.
premium-grade plywood has a tight, consistent grain that absorbs diluted paint evenly across the surface. There are no wild variations in density that cause pooling or streaking. The wood is light in color to begin with, so the whitewash reads as a natural extension of the material rather than a coating sitting on top of it.
And then there is the edge grain. premium-grade plywood is built up from many thin layers of birch veneer, and when you look at the edges, you see those beautiful laminated stripes. When you whitewash furniture made from premium-grade plywood, the wash settles differently into each of those layers, creating a gorgeous, subtle striped effect on the edges that you simply cannot get from solid wood. It becomes a design detail on its own.
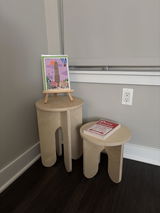
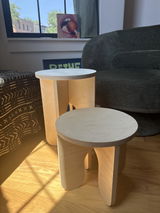
This is one of the reasons UNFNSHED pieces work so well as blank canvases for whitewashing. Every piece is made from premium premium-grade plywood, left completely unfinished so you can apply exactly the finish you want. The Round Coffee Table is a particularly popular choice for a whitewash project because the broad, flat top shows off the grain beautifully.
Three Ways to Whitewash Furniture
There is no single correct way to whitewash. The method you choose depends on how bold or subtle you want the effect, what materials you have on hand, and how much time you want to spend. Here are the three most popular approaches.
1. Diluted Paint Wash (The Most Popular Method)
This is the go-to for most DIYers and the method we will break down step by step below. You mix white latex paint with water (typically a 1:1 ratio, but you can adjust), brush it on, and wipe it back with a rag before it dries. The water thins the paint enough to let the grain show through while depositing a soft, even layer of white pigment. It is fast, it is cheap, and it is incredibly easy to control. Want more coverage? Add less water. Want a barely-there wash? Thin it down further.
2. Dry Brush Technique
Dry brushing gives a more textured, weathered look. You dip your brush in undiluted white paint, then wipe most of the paint off on a paper towel until the brush is nearly dry. Then you drag it lightly across the wood surface in long, quick strokes. The paint catches only on the raised grain and surface texture, leaving a streaky, organic finish that looks like years of salt air and sunshine did the work. This method is great for a more rustic, driftwood-inspired look, but it takes a lighter touch and a bit more patience to get even results.
3. Lime Wash
The original. Traditional lime wash uses slaked lime (calcium hydroxide) mixed with water, sometimes with a small amount of salt added for adhesion. It creates an ultra-matte, almost chalky finish with incredible depth. Lime wash is breathable and will develop a gentle patina over time, which is part of its charm. The downside is that it can be messier to work with, it requires proper ventilation, and the finish is less durable than a paint-based wash without a topcoat. For furniture that will see daily use, the diluted paint method is more practical. But for decorative pieces or anyone chasing that authentic old-world coastal feel, lime wash is unmatched.
For your first whitewash project, go with the diluted paint wash. It is the most forgiving, the easiest to correct, and gives you the most control over the final look. Once you are comfortable with the technique, experiment with dry brushing for accent pieces or lime wash for statement furniture.
Step-by-Step: How to Whitewash Furniture with Diluted Paint
This walkthrough covers the diluted paint method from start to finish. The whole process takes under an hour for a small to medium piece, and the results dry in about two hours.
- White latex paint (flat or matte finish works best)
- Water
- A mixing container (mason jar, plastic cup, old yogurt container)
- A 2-inch to 3-inch flat paintbrush or chip brush
- Clean cotton rags or old t-shirts (at least 3-4)
- 220-grit sandpaper
- Painter's tape (if protecting any areas)
- Drop cloth or old sheet
- Clear matte polyurethane or wax for sealing (optional but recommended)
Step 1: Prep the Surface
Start with bare, unfinished wood. If you are working with an UNFNSHED piece, you are already ahead since every piece ships raw and ready to finish. If your furniture has an existing finish, you will need to sand it down to bare wood first.
Give the surface a light sanding with 220-grit sandpaper, going with the grain. You are not trying to reshape anything. You just want to open up the wood pores slightly so the wash absorbs evenly. Wipe away all sanding dust with a damp cloth and let it dry completely. This step matters more than you might think. Dust left on the surface will mix with the wash and create a gritty texture.
Step 2: Mix Your Wash
Pour equal parts white latex paint and water into your mixing container. Stir thoroughly until the mixture is smooth and uniform. It should feel like whole milk: thin enough to flow easily off the brush but not so watery that it runs everywhere.
Before you touch your furniture, test the mixture on a scrap piece of wood or on the underside of the piece. This lets you check the opacity and adjust before committing. If the wash looks too heavy, add more water. If it is too sheer, add a touch more paint.

Step 3: Apply the Wash
Work in sections. Dip your brush into the wash and apply it to a manageable area, roughly 12 inches by 12 inches at a time, brushing in the direction of the grain. Do not worry about being neat. The wash should go on loose and fluid. You are going to wipe most of it away in the next step, so coverage does not need to be perfect.
Step 4: Wipe It Back
Here is where the magic happens. While the wash is still wet (within 30 to 60 seconds of applying it), take a clean rag and wipe the surface in the direction of the grain. The rag removes excess wash and pushes the remaining pigment into the grain pattern. Press harder for a more subtle effect. Press lighter for more visible white coverage.
Switch to a clean section of your rag frequently. A paint-saturated rag will start depositing white back onto the surface instead of removing it. Work quickly and keep a steady rhythm: brush on, wipe back, move to the next section.
Step 5: Build Up Layers (Optional)
One coat gives a soft, barely-there wash. Two coats bring more visible white coverage while still letting the grain show. Three coats approach a pickled or limed look. Let each coat dry for at least 30 minutes before applying the next. The beauty of this method is that you are in complete control. Step back, look at the piece from across the room, and decide if it needs another pass.
One coat gives you a whisper. Two coats give you a conversation. Three coats and the wood is telling stories about beach houses and salt-worn porches.
Step 6: Let It Cure
Once you are happy with the coverage, let the piece dry fully. In a well-ventilated space, this usually takes two to four hours. Do not rush it. The whitewash will look slightly darker when wet than it will when dry, so give it time to settle before judging the final result.
Sealing Your Whitewashed Furniture
Whitewash on its own is not very durable. It can scuff, watermark, and wear away with daily use. If your piece is purely decorative, you might love the way an unsealed whitewash ages and develops character over time. But for anything functional (a coffee table, nightstand, side table, shelf), sealing is the move.
Your best options:
Clear matte polyurethane: This is the most protective choice. Apply one to two thin coats with a brush or foam roller, sanding lightly with 320-grit between coats. A water-based poly will keep the whitewash color true. Oil-based poly will add a slight warmth or amber tone, which can be a beautiful effect on its own.
Clear furniture wax: Wax gives a softer, more natural feel and a subtle sheen. It is less protective than poly but easier to apply and reapply. Rub it on with a cloth, let it haze, and buff it out. Wax is a good choice for pieces that get light use.
Matte spray sealant: For a quick, even coat, a spray-on matte sealant works well. It is the fastest option and gives an ultra-thin protective layer. Two light coats beat one heavy coat.
For more on choosing the right finish for your project, check out our Favorite Finishes guide, where we break down the most popular finishing methods our customers use on their UNFNSHED pieces.
- Always brush and wipe in the direction of the grain. Going against it creates a muddy, uneven look.
- Keep your rags dry. A damp rag will thin the wash further and give you less control.
- For a warmer coastal look, add a tiny drop of raw umber or beige acrylic paint to your white wash mixture.
- Sand lightly between coats with 320-grit for the smoothest possible finish.
- Work in a well-lit space so you can see how the wash is settling into the grain as you go.
- If you go too heavy, sand it back gently and reapply. Whitewash is very forgiving.
Project Ideas and Color Combos
Whitewash is the starting point, not the finish line. Once you have the basic technique down, the creative possibilities open up fast.
Classic coastal white: A straight white wash over raw birch. Pair it with linen cushions, rattan baskets, and brass hardware. This is the look that started it all, and it still works beautifully in bedrooms, bathrooms, and sunrooms.
Driftwood grey: Mix a light grey paint with water instead of white. The result is a weathered, silver-toned finish that feels like wood pulled from the shore. Stunning on shelving units and side tables.
Warm whitewash with a honey seal: Apply a classic white wash, then seal with an oil-based polyurethane. The amber tone of the oil poly warms up the white, giving you something between whitewash and natural wood. It has a sun-faded, golden hour quality.
Two-tone whitewash: Whitewash the body of a piece in classic white and use a slightly tinted wash (pale blue, seafoam, or sage) on the top surface or inner shelves. The contrast is subtle but gives the piece depth and personality.
Whitewash and natural contrast: Leave certain elements of the furniture in raw, unsealed birch while whitewashing the rest. On a nightstand, for example, whitewash the exterior and leave the interior shelf natural. The contrast between finished and raw creates a modern, intentional look.
Curious how a whitewash finish would look on a specific piece before you commit? Try the UNFNSHED AI Visualizer. Upload a photo of your space or choose a piece from the collection, and preview different finishes, including whitewash, in your room. It takes the guesswork out of the process and helps you nail the color and intensity before you pick up a brush.

Why Starting with Unfinished Furniture Makes All the Difference
You can whitewash furniture that already has a finish on it, but you will spend more time stripping and sanding than you will actually whitewashing. When you start with raw, unfinished wood, the wash absorbs directly into the grain on the first pass. There is no barrier between the pigment and the wood fibers, and that direct contact is what gives whitewash its signature look: the paint sitting in the grain while the natural wood color shows on the surface between the grain lines.
UNFNSHED furniture is built for exactly this kind of creative freedom. Every piece is cut from premium premium-grade plywood, left completely raw, and designed to assemble in under two minutes with zero tools. You open the box, slide the pieces together, and you have a structurally sound piece of furniture ready for whatever finish inspires you. No stripping. No sanding through old paint. No mystery coatings.
Take a look at what other customers have done with their pieces over on Customer Creations. You will find everything from classic whitewash to bold color stains, and it is a great source of inspiration for your own project.
Ready to whitewash your way to coastal calm? Every UNFNSHED piece ships as a blank canvas in raw premium-grade plywood. Assembles in under 2 minutes, no tools needed. Made in San Diego.
Start with a Blank Canvas